September 26, 2013

Understanding Financial Statements: The Balance Sheet - Business Management 101

The balance sheet is often described as a “Snapshot” of the current company’s financial condition on a certain date. It shows the “Assets” on the left, or top, of the balance sheet, and the “Liabilities and Owners Equity” on the right, or bottom. The Assets must balance out with the Liabilities and Owners Equity. Assets are what a company owns, such as equipment, buildings and inventory. Claims on assets include liabilities and owners' equity. Liabilities are what a company owes, such as notes payable, trade accounts payable and bonds. Owners' Equity represents the claims of owners against the business. The formula is Assets = Liabilities + Owners’ Equity.

Example – The Balance Sheet. There are explanations for each item following the Balance Sheet.


Here is a brief explanation of the type of Assets, Liabilities, and Owners’ Equity associated with a common Balance Sheet:

ASSETS - They are listed in order of their liquidity, which means how easily they can be converted into cash. Current assets are first, then non-current assets, and finally all other assets. Here are the most common types of assets:

Cash, both in checking and savings along with petty cash

Marketable Securities, which are short-term investments, like U.S. Government securities or the commercial paper of other firms. These often earn higher interest than checking or savings accounts earn

Accounts Receivable, which is money owed to the company by its customers, usually within 10 to 60 days. There is usually also some bad debt, around 2%, that gets written off. For example, a customer who purchased your product but never paid

Notes Receivable, which is money due from debtors.

Inventory, which is the goods for sale to customers, or goods in the manufacturing process:
  • The inventory for a Manufacturer would be the raw materials to make its products, the unfinished products still being made, and the finished goods that are awaiting sale.
  • The inventory for a Retailer would be just the finished goods. They would not deal with the raw materials or have a unfinished product.
  • The inventory for a Service company would have little to no inventory on their balance sheet due to the nature of the business.
Long-Term Assets or Tangibles, also known as “Fixed Assets.” The land, buildings, factories, and warehouses, including the machinery, furniture, computers, and fixtures that are owned by the company. These assets can depreciate, or lose value, on each year’s balance sheet due to age, etc.
  • Accumulated depreciation is a way to allocate, which means assigning, the cost of a fixed asset with a life of over one year. The cost of the asset is charged against income over the life of the asset rather than all in one year. This is also known as a “contra account,” which in essence carries a minus sign.
Intangible Assets, which are non-physical products like patents, which are exclusive legal rights granted to an investor for a period of 17 years, trademarks, which are distinctive names or symbols granted for 28 years with option for renewal, goodwill, which is the amount of money paid for the asset above the value it was assigned by the previous owner, and copyrights, which is a form of intellectual property that gives the creator of an original work exclusive rights for a certain time period.

Investments, Prepayments and Deferred Charges, which is monies already spent, that will yield benefits in upcoming years like insurance coverage, rent, etc.

LIABILITIES - which is everything the company owes, mostly to suppliers and creditors. Current liabilities are those payable within a year of the date of the balance sheet. Here are the most common types of liabilities:

Long-term debt, which is the debt due after one year of the date of the balance sheet.

Notes Payable, which are short-term borrowings that are payable within the year. It is a promissory note, which is basically a written promise to pay.

Accounts Payable, which is the amount the company owes to suppliers.

Federal income taxes, and when applicable city and state taxes.

Accrued Expenses Payable, which is all other monies, owed at the time of creating the balance sheet including employees, contractors, utilities, etc.
  • i.e. Current Portion of Long-term Debt, which is the amount due within a year from the date of the balance sheet. This would be considered a current liability.
Notes Payable, which are non current (due after 12 months) borrowings. It is a promissory note, which is basically a written promise to pay.

Bonds payable, which is the obligation due on maturity of bonds.

Pension obligations, which is the liability for future pension benefits due to employees.

Deferred Taxes, which are the longer-term tax obligations that have been deferred to some future period.

Minority interest, which is the ownership of minority shareholders in the equity of consolidated subsidiaries.

OWNERS' EQUITY (also known as Stockholders’ Equity - when applicable) – which is the amount left over for the company’s owners after the liabilities are subtracted from the assets. The formula is “Assets – Liabilities = Owners Equity.” This is also referred to as “Net Worth.” If the company is incorporated, they can issue stock. Stocks represent ownership in a corporation. A share of stock is one unit of ownership. Investors buy stock to share in the company’s profits, where as the company issues stocks to raise money from the investors. If the company is not incorporated, such as a Sole Proprietor, they will not have accounts for stock, but will invest the money back into the company through “Retained Earnings.” If this number is zero or negative, then the company is obviously in trouble and steps will need to be taken, or else there is the chance of bankruptcy.

Preferred Stock, which is a type of stock that pays a dividend. It is a payment from profit made to stockholders out of the company’s income at a specific rate, regardless on how the company performs. Owners of preferred stock do not have voting rights such as who should be on the Board of Directors or whether or not to sell the company. They only get dividends if the company has earnings to pay them. It is called preferred because the dividend must be paid before dividends are paid on the common stock.

Common Stock, which the owners have voting rights, but do not receive dividends at a fixed price. The value of the stock can rise or fall.

Capital Surplus, also known as “additional paid-in capital,” is the amount paid to the company in excess of the par value. When a company issues a stock, the stock has a par value, a value assigned to a share of stock by the company. This value does not determine the selling price, or market value, of the stock. The selling price that the investor pays per share is determined in the market

Retained Earnings, which is money reinvested into the company and becomes part of the capital that finances the company.

Treasury stock, which is stock in the company that has been repurchased and not retired

As you can see, the “Total Assets” for each year equaled the “Total Liabilities Equity.” It is called a “Balance Sheet” because it has to balance. Each dollar value was a “Snap-Shot” on the date of the financial statement. Assets are in order of their liquidity and how fast they can be converted into cash. Current assets are expected to be liquidated within one year of the date of the Balance Sheet. Liabilities and Equity are in order in which they are to be paid. Current Liabilities are payable within one year. Also, as you can see, there are two years of figures on the balance sheet for comparison and trending purposes.

Managers seeking to lead their department must learn to read between, above, and around the numbers to uncover two key indicators: proportion and direction.

Proportion: Your company’s financial reports reveal interesting and important information on the proportion of physical assets (plant and equipment) versus cash flow. This is important because the speed at which a company turns over its assets reveals how capital-intensive (requires large amounts of money) that business is. If you turn over assets quickly, you can afford low margins (profit) per sale. If you turn over assets slowly, you must earn a steep margin per sale. The key point here is if you turn over assets slowly, and earn little profit per sale, you will not be adequately profitable. It’s the proportion of cash flow versus physical assets on the balance sheet that tells you how hard you have to work those physical assets to make an adequate profit. The larger the investment in assets one has to make in a business in relation to sales, the greater the margin one needs to make on each sale.

Direction: A general sense of a company’s direction can be assessed from its financial statements. Sometimes relationships between a company’s resources and its sales growth get out of whack. If a company must invest a disproportionate amount of assets for each dollar of sales increase, then the company will be pouring extra money into its assets to such an extent that it will eventually run out of money. For example, if a company wants to grow by 20% on a sustainable basis, management must continue to add 20% to the retained earnings. This is reflected in the balance sheet in the shareholders equity. If shareholders equity grows by only 10% at a sustainable level, the company can grow by only 10% at a sustainable level. The only way to exceed 10% growth is to increase profitability or acquire additional debt (borrow more money). This is why it is so important to understand how to read the balance sheet so you can see a snapshot of the company’s direction.

September 22, 2013

Back to School Apps: Save Money With These Android, iOS Apps

Books, computers, school supplies -- that's a lot for students to think about and keep track of as they head back to school. Whether students are returning or entering college for the first time, or just heading back to middle school or high school, they will likely meet distractions that challenge their ability to master their schedule and stay on track

But getting ready for school doesn't mean having to go out and buy a ton of school gadgets anymore. Yes, you might need to get a new laptop, tablet or phone, but you can forget about the planners, alarm clocks and even the college-ruled notebook with a set of really good apps. Here you'll find a list of our must-have apps to help students -- or anyone with a busy life -- stay afloat.

1. Any.Do


First, you can toss the planner. Any.Do allows users to create, keep track of and check off al those important items that need action. To use the app effectively, grant Any.Do access to your calendar and contacts list. From there, swipe "Tomorrow" to begin adding items to your task list. Once you enter a to-do item, the app displays another row of tiny buttons to further customize your list. Set up a reminder by tapping the bell icon, or include people from your contacts for shared projects, for example. When you hold your phone vertically, you can view your tasks as a cascading list broken into "Today," "Tomorrow," "Upcoming" or "Someday." The app's simple interface combined with its gesture enhanced feature list and a few other nifty customizable options makes Any.Do a must-have app for managing your day-to-day, even if it means reminding you of midterms and finals. (Free; Android, iOS)

2. Alarm Clock Apps

Yes, phones have built in alarms, but if you're headed to college you'll likely need a snooze-button with some extra kick. You know what we mean.

Dance Alarm Clock

Dance Alarm takes forcing you out of bed in time one-step further: The app is motion activated, meaning it won't stop until it senses you are moving. The app syncs with your iTunes library and allows you to customize the background with some basic features such as a Disco Ball or a Color Strobe, and create a customized completion message. Dance Alarm won't impress you with it's elegant interface, but that's not the point. The app's primary function is to get you out of bed on time, and in this way it not only does that but provides pure fun too. ($0.99; iOS)  

Timely

For Android users, there are some creative options too, but Timely is attractive and packed with features. There are a few themes to choose from, and a Smart Rise feature starts with a slow, fading alarm sound to prepare you for waking up before you actually have to jump out of bed. You can also snooze by flipping your phone over and change the size of the snooze button if you prefer to smack it with your hand. (Free; Android)


3. iHomework

Staying on top of assignments, exam schedules and all those reading lists can prove a challenge. iHomework assists you in keeping all the information organized, accurate and up-to-date.

Choose from a row of buttons on the bottom of the screen to add course information, reminders and details about your professor.

From the "work" tab, set up details about assignments, such as due dates, add partners to group projects from your contacts list and keep track of your grades. iHomework integrates with Questia, an online research library, providing students with quick access to reading materials for all of those major projects. The app provides a syncing option, too, making it easy for students to seamlessly tap into the information they collect across their portable devices, such as their iPhone or iPod, and their desktop. ($1.99; iOS)  

4. Evernote

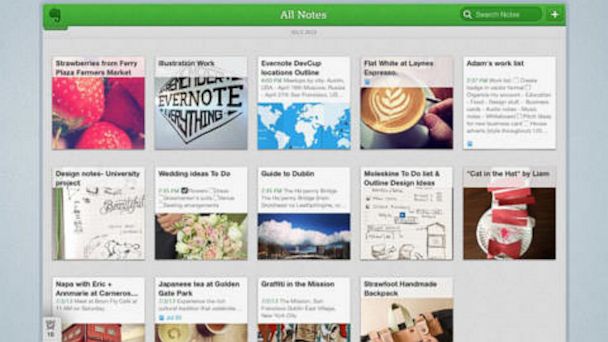
Evernote means never having to lose your notes or notebook again. The app, which is available for almost every platform -- iOS, Android, Windows Phone and the Web -- provides users with a set of options when it comes to taking notes, and syncs your notes across devices. Users can draft essays and outlines, sketch out ideas and create and complete worksheets. With the app you can also paste in diagrams and images to create study guides, and then easily share them with friends. (Free; iOS,Windows Phone, Android)

5. Kno

Yes, textbooks are also on their way out. Apple has iBooks and Google has textbooks through its Google Play Store, but Kno may offer some of the best tools for taking notes and digging in to your digital books.

Kno has worked with textbook makers to make textbooks more interactive with 3-D models and videos, and has also added some functionality such as automatic Flashcards and collaborative tools. The Flashcards function is particularly cool. It generates such study tools as cards and a test tied to the content in the chapter. And because many teachers now share PDFs and other course material, Kno lets you import them into the app. (Free for app; iOS, Android)

September 21, 2013

How to Install the PHP Engine on Your Windows PC

If you want to write your own PHP scripts, you'll need to install the PHP engine first. It's relatively easy, and this article will show you how to do so.

1.   If you haven’t done so already, download the PHP Windows Binaries - You can download the software from the PHP.net website, (http://www.php.net/downloads.php).  Be sure to download PHP 5.2.9 installer Windows installer and PHP 5.2.9 zip package. (Note: the version numbers might be different). Save the files on your Windows Desktop.

2.   On your Windows Desktop, double click the PHP installer file. Once you've done that, you should see a window that looks like this:


3.  Click "Next>".

4.  On the next window, click "I Agree".

5.  On the next window, click the radio button "Advanced", and click "Next>".

6.  We're going to install PHP in our server directory instead of the default PHP directory, so in the "Destination Folder" group, click "Browse".

7.   A browser window will open. Change the destination directory to "C:\Server\PHP". There is no need for a trailing backslash.

8.   Click "OK" on the browser window, and then click "Next>".

9.   Select "Next>" on the next three screens.

10.  On the following window, leave the SMTP defaults as they are, and click "Next>".

11.  If you want, you can enter an email address. This will be used as the "From:" email address when using PHP's mail function.

12.  On the next window, make sure that the radio button "Display all errors warnings and notices" is clicked. Then click "Next>".

13.  On the next window is where you pick which web server software you are using. Since you have installed Apache, pick "Apache" from the list. Then click "Next>".

14.  On the next window make sure that the check box ".php" is checked, and then click "Next>".

15.  Now that you have set all the options, you should see a window that looks like this:


PHP is ready to install, so click "Next>" to begin the installation.

16.  If a message window pops up asking, "Do you want to keep your php.ini file", click "NO".

17.  Wait for a message window to pop up, that looks like this:


 This is normal. Click "OK". When the PHP installer window pops up, click "OK" again.

18. Now PHP is installed, but we need to change some of Apache's settings to get everything working the way it should.

19.  In Windows, open "My Computer", and browse your way to the folder "C:\Server\Apache2\conf".

20. Double click the file "httpd.conf" so we can edit it. This will normally open the file in Notepad, unless you use a different program.

21. Scroll to the very bottom of the page, and add these lines:
  • ScriptAlias /php "c:/server/php/"
  • AddType application/x-httpd-php .php
  • Action application/x-httpd-php "/php/php-cgi.exe"
22. Highlight and copy the text from this page, and then paste it into the httpd.conf page to ensure there are no typos. Hit "Enter" after the last line to ensure there is one blank line at the end of the file.

23. Move the file "C:\Windows\php.ini" to the directory "C:\Server\php" so it’s easier to edit when you need to.

24. Open "My Computer" and browse to "C:\Windows".

25. Find the file "php.ini" in the windows directory.

26. Right-click the file and pick "Cut".

27. Browse to the directory "C:\Server\php".

28. Right-click an empty area in the window and select "Paste". This moves the "php.ini" file from the Windows directory to the PHP directory.

29. Double click the file php-5.2.9-win32.zip that is saved on your desktop. (Note: the version number might be different).

30. Extract the contents of this file to "C:\Server\php".

31. Using Notepad, open the file "C:\Server\php\php.ini".

32. Find that line that reads: extension_dir = "./" (or something similar, as long as its the line with "extension_dir".

33. Change the line to: extension_dir = "C:\Server\php\ext"

34. Find the line that reads: ;extension=php_mysql.dll Delete the ; so that the line now reads: extension=php_mysql.dll

35. Open the directory "C:\Server\MySQL\bin".

36. Find the file "libmysql.dll".

37. Right-click the file and select "Copy".

38. Browse to the directory "C:\Windows\System32" and Paste the file into that directory.

39. Restart Apache to ensure the new lines added to the httpd.conf file have an effect.

40. On the Windows taskbar click "Start">"All Programs">"Apache HTTP Server">"Control Apache Server">"Restart". This should restart the Apache server. Now we need to create a test PHP to see if everything is working.

41. Open Notepad (usually found in "Start">"All Programs">"Accessories">"Notepad"), and copy and paste the following lines into a new document: <?php phpinfo(); ?>

42. In Notepad, click "File">"Save". Save this file in the directory "C:\Server\Apache2\htdocs" as "phpinfo.php". Notepad has a bad habit of adding .txt to the end of all documents you save, so make sure from the "Save" dialog that comes up in Notepad, change "Save as type" from "Text Documents (*.txt)" to "All Files". Now click the "Save" button to save your new PHP document.

43. Open your favorite browser. In the address bar, type "http://localhost/phpinfo.php". If everything is set up correctly, you should see a page that looks like this:

September 20, 2013

Are You Too Hard on Yourself???

I have a feeling that I am not the only person who has a list of things I wish I should not have done, or said, or thought in my life. Sometimes my mind will suddenly remind me of something I did back in middle school and I start beating myself up mentally for it yelling silently “why did I do that”, “what was I thinking” then insecurity and lack of confidence sets in. Or mistakes in later life, in general doing what I thought was right, and not what is in a plan for a happy life.

God can deliver you from being too hard on yourself, and he desperately wants to remind you of His strengths being made perfect in your weaknesses. We all have weaknesses, in fact we all say and do things we wish we wouldn’t have on a daily basis. However when you allow your mind to consume you with criticisms you slide into self-defeat and ultimately a self-consumption of you and only you. Instead of thinking how others might be feeling you begin thinking how you are feeling. Usually, at least in my case, my prayer life would even be flooded with prayers about myself and my failures, not the needs of people around me.

Finally I had to come to a point where I was ready to stop wishing I could change the past. It’s impossible for us to change the past and what we have done, but God can make all things work together for good – including our mistakes.

Perhaps you are hard on yourself for something you said or did to someone, in this case you can do the right thing by asking for their forgiveness, forgive yourself and move forward. You can start being easier on yourself as you let God begin to release you from the bondage of holding yourself hostage in the past. He will release you and show you how you can move forward.

I also bet I am not the only person who is quicker to forgive others than myself. It was powerful for me to realize that by not forgiving myself for my mistakes, I was being prideful and having a hardened heart. If I believe God has forgiven me and covered all my sins but refuse to forgive myself, I am fighting against Him who died to set me free! He wants to set me free, he died for that, so I need be willing to help him in the process of making me more and more like Him.

As I worked through my negative and harsh criticisms I began to rely more and more on God’s promises. I don’t have to think constantly about what I could have done but rather what God has done in my life! That is the key I have found – think about what God has done in your life and what he is continuing to do. You may have a long way to go but thank God you are moving forward! 

September 15, 2013

Using Black Hat SEO Techniques in a White Hat Way

Black hat SEO involves using marketing techniques which are against the search engine's guidelines. Employing these tactics can result in your site being penalized or banned from the index. 

The thought of being banned from Google often results in people rejecting black hat methods outright without taking the time to think if these methods could be modified in an acceptable way.

By using black hat ideas and then altering them to stay on the right side of the search engine guidelines, it is possible to benefit without as much risk.

1. Expired domains

Website owners often lose interest in their sites and do not renew them when they expire. All the links which these website acquired usually remain, even though the site no longer exists.

The black hat method:

One black hat technique which has been used for a number of years involves purchasing expired or dropped domains and 301 redirecting them to a money site. Google often does not reset expired domains and a 301 redirect can transfer most of the link equity to the URL of your choosing.

There could be a number of legitimate reasons why you would 301 redirect a domain to another site. For example, you could have taken over a competitor or you may have rebranded an old site to a new one.

However, if you are trying to manipulate the flow of Page Rank by redirecting random sites, Google considers this to be against its terms of service. The more domains you redirect to your site, the more your risk increases of being penalised.

The white hat alternative:

Instead of buying just any expired domain, look for ones which are relevant to your niche. If you are able to find an expiring domain that is similar to your website niche, think about buying it and building it out, providing a useful resource to people who would otherwise end up on a 404 page.

Where possible, you could use Archive.org to resurrect the old site, making slow, incremental changes. At some point in the future, when it is useful for visitors, you may be able to find an opportunity to link back to articles or sections of your money website, which should result in improved rankings.

Tip: If you are going to use this technique, I would suggest hosting the expired site on a separate C class domain and using privacy protection if possible.

2. Comment spamming   

The black hat method:

Like a car thief looking for an open door, spammers play a numbers game, hoping that a webmaster will automatically approve comments or accidentally let one through.

Once they find a site that allows their comments, they will come back and leave an endless stream of links back to their site.

The white hat alternative:

Instead of polluting the web with worthless comments, why not play a more intelligent game, leaving comments which are useful, informative and engaging on blogs within your niche.

Don’t even include a link initially. The idea is to build rapport and a relationship with the website owner.

Once you have complemented/suggested/assisted/and engaged the webmaster, they are going to be much more likely to reciprocate. This reciprocation could be in the form of linking back to some content you have created or allowing you to guest post on their blog.

3. Paid links  

The black hat method:

Google states that buying or selling links that pass PageRank is a violation of its Webmaster Guidelines, therefore buying links is black hat.

It is not hard to spot an overtly paid link, they tend to be anchor text heavy and surrounded by other links to low quality sites.

A quick analysis or a manual review from Google could result in these links being discounted at best or at worst, your site being penalized.

The white hat alternative: 

There is ambiguity over what the search engines consider a paid link.

Is a donation to a charity a paid link? Is sponsoring an event a paid link?

What about giving away one of your products that results in a link? You can set up a Google Alerts to send you potential opportunities that could result in legitmate ‘paid’ links.  For example:
  •  site: joeblow.com "link on our website"  + "your  niche"
  • "the following sponsors" + "your niche"
  • "the following companies donated" + "your niche"
Tip: If you are going to donate to a charity or sponsor event, it’s best to try and find a relevant charity or event. For example, if you sell running shoes, why not donate to an obesity or other related charity.

4. Mass directory submissions  

The black hat method: 

It’s not uncommon to see ads, offering to submit your site to 500 directories for a few bucks. Google only provides broad guidelines around this tactic, stating that we shouldn’t “participate in link schemes designed to increase your site ranking or PageRank”.

As many of these directories have ‘SEO’ in their URLs, it’s a sure sign to anyone looking over your link profile that you are trying to game the system.

The white hat alternative:

Target niche directories related to your website. Not only will these directories look more natural if anyone from the Google Spam team were to look over your link profile, but many will provide real traffic and targeted leads and have added SEO benefits.

In summary... Like an investment in the stock market, your SEO tactics should factor in your goals, strategy and risk tolerance. Whichever techniques you decide to use, make sure you weigh up the risk and rewards of using it and how aggressive you are.

Being too aggressive can lead to your site being manually reviewed which opens up your entire history and potential wrongdoings.

September 13, 2013

Top Internet Business Opportunities

Starting an Internet business can help provide a second income to your household, give you extra spending money for fun or supply a full-time income that isn't directly subject to the whims of the economy and job market. The many options available for starting an online business can be overwhelming and confusing, but the top Internet business opportunities generally fall into three areas. These areas rank high because they're inexpensive or free to start, and you can begin making money within days of launching the business.

Affiliate Marketing

Affiliate marketing is an Internet business opportunity that lets you promote other people's products or services and earn sales commissions. As an affiliate marketer, you get to choose which products or services you promote and how. You can promote products through an online website, for example, that's set up to operate like a regular e-commerce store, or you can simply advertise the products directly through online newspapers or search engines.

As an affiliate marketer, you do not have to provide customer support on products ordered, nor do you deal with shipping, product refunds or returns. Each time sales are made due to your promotional efforts, you earn a percentage in sales commissions. Affiliate marketing businesses can be launched overnight, with no initial cost using free online resources.

Free online resources include free blogging websites such as Blogger or Wordpress, social networking sites such as Facebook or YouTube and free classified advertising sites such as Craigslist.

Freelance Writing

Freelance writing is a versatile Internet business opportunity, because you can sell your writing services to clients directly or use your writing skills on your own website or blog. When writing for your own websites, you earn money by selling advertising space to pay-per-click search engines such as Google and Yahoo or by selling the ad space directly to companies whose products or services match the topic of your website.
Many freelance Internet writers earn additional money by placing relevant affiliate advertisements on their websites, offer custom writing services to clients on a contract basis or write reports and electronic books to sell directly to their website visitors.

E-Commerce

E-Commerce is the online version of running a retail store. You sell products online directly through your own business website or through partner networks such as eBay Stores or Amazon shops. PCWorld states that, "Thousands of merchants use Amazon to promote their goods, giving Amazon a cut when items sell." Merchants like this setup because they can sell practically anything and they don't need to maintain a website of their own or deal with complicated credit card processing technology.

September 7, 2013

Display Video Thumbnails With Drupal Media Module

The Media module is great for managing media files such as images and videos on a Drupal website. Today we discuss video handling, specifically how to display a video thumbnail.

In this tutorial, you'll learn how to display a thumbnail for videos that are hosted on YouTube and Vimeo. Then, we'll look at how to change the video "preview" view mode.

Getting Started

Before we begin, download and install the following modules:
If you use Drush, run the following command:

$ drush dl media media_youtube media_vimeo ctools views

Step 1: Create Video Field

First we'll create a field called "field_video" on the Article content type that'll reference our YouTube or Vimeo video.

1. Go to Structure -> "Content types" and click on "manage fields" within the Article row.

2. Create a video field using the values defined in Table 1.0.

Table 1-0. Create video field
Option Value
Label Video
Machine name field_video
Field type File
Widget Media file selector

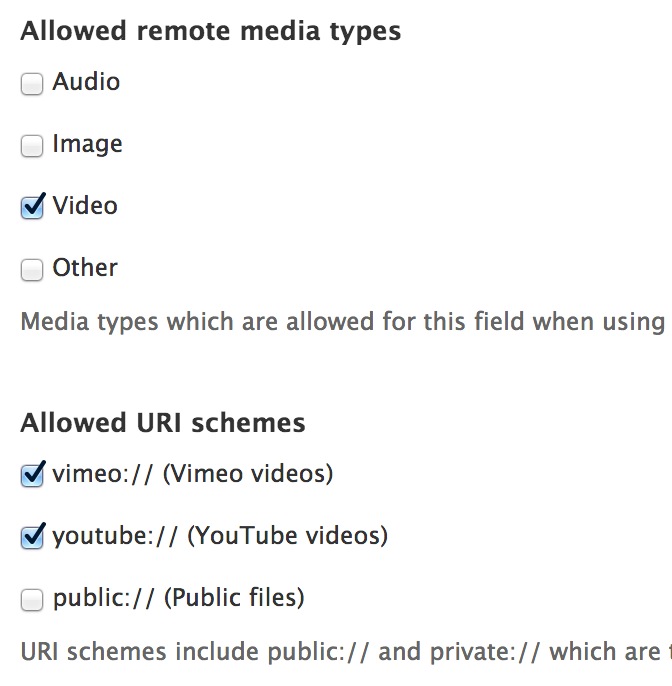
3. On the video field edit page: check the Video checkbox within the "Allowed remote media types" list and check both "vimeo:// (Vimeo videos)" and "youtube:// (YouTube videos)" within the "Allowed URI schemes" list.

Fig 1.0

Once you have checked the right checkboxes click on Save settings.

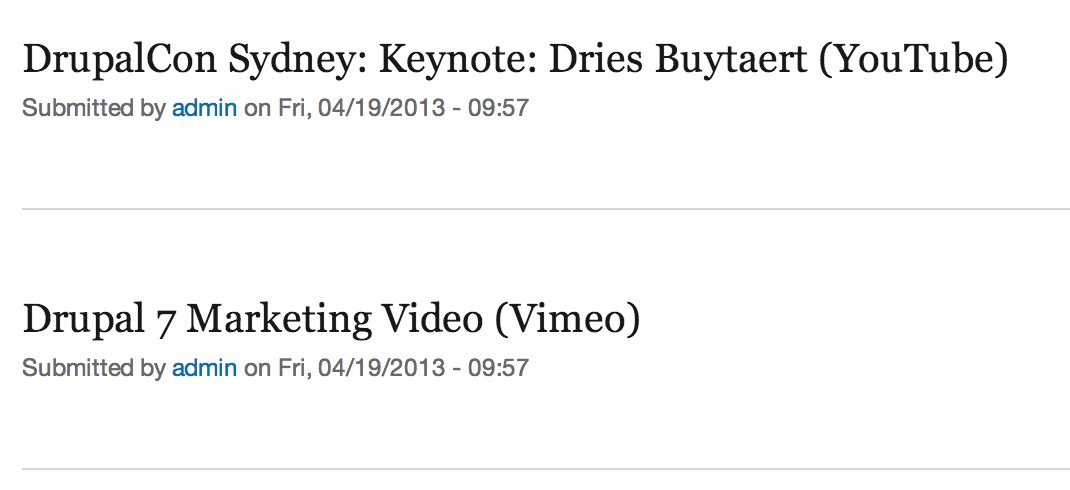
At this point, we have a video field on the Article content type. Now we need to create some test content, for this tutorial I used the following two videos:
Fig 1.1

Step 2: Create Views Page

Now we're ready to create our views listing page. At this point, we have a video field and some test content. The only work left for us to do, is create a listing page that will display the "Preview" view mode of the video.

1. Go to Structure -> Views and click on "Add new view".

2. Fill out the "Add new view" form using the values defined in Table 1.1 and click on "Continue & edit".

Table 1-1. Create a new view
Option Value
View name Recent videos
Machine name recent_videos
Show Content of type Article sorted by Newest first
Create a page Checked
Page title Recent videos
Path recent-videos
Display format Unformatted list of fields

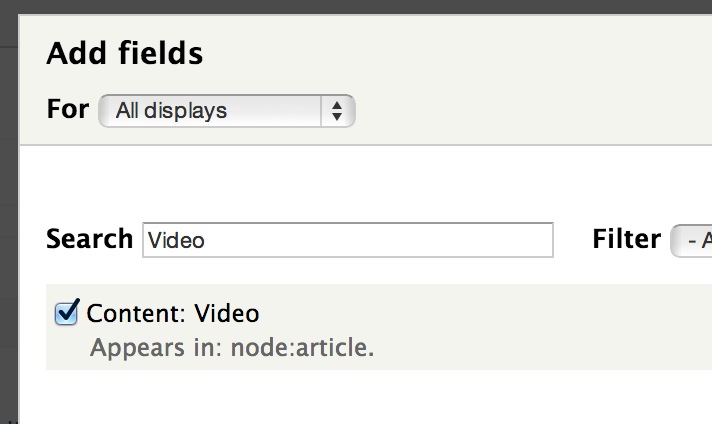
3. Click on Add within the Fields field-set and select the Video field.

Fig 1.2

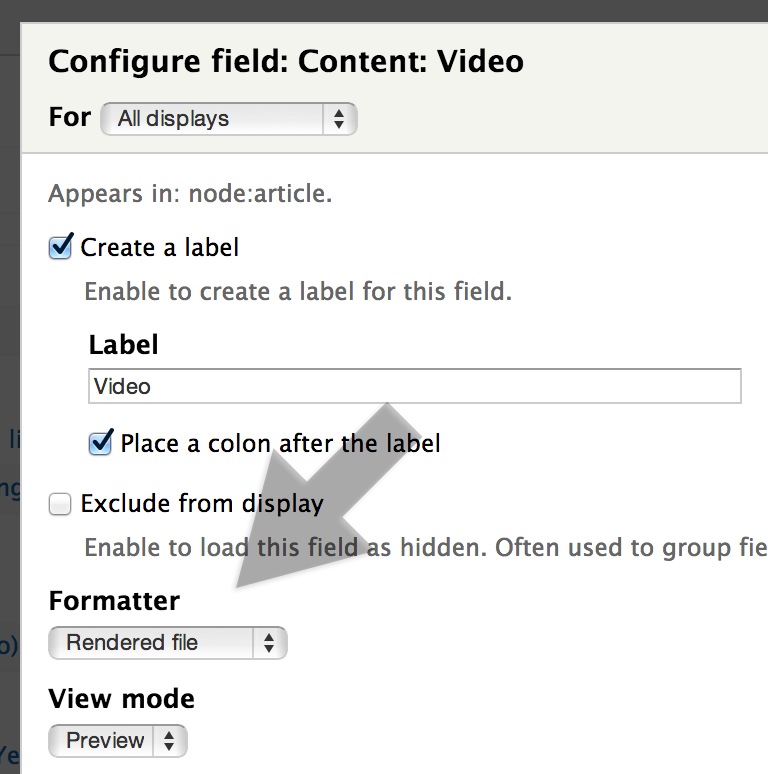
4. Select "Rendered file" from the Formatter drop-down list and then select Preview from the "View mode" drop-down list.

Fig 1.3

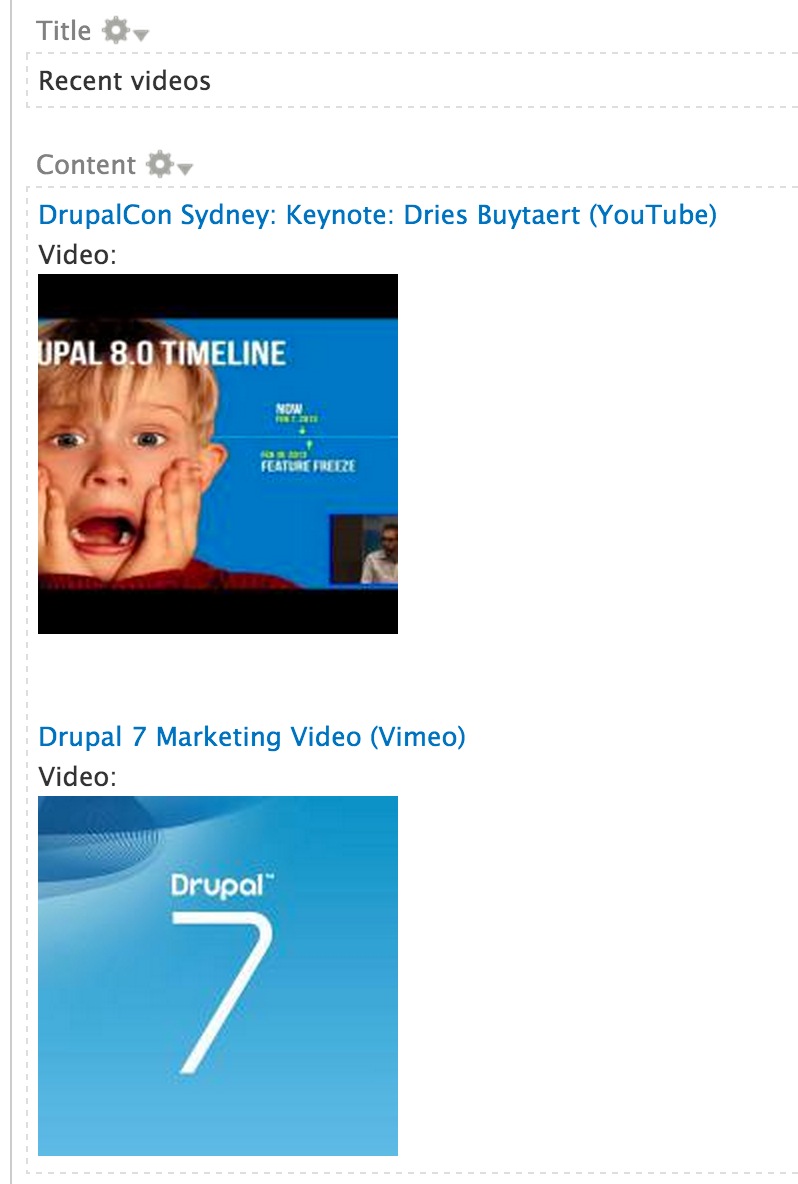
Now if you look at the views preview, you should see resized images of the video thumbnails.

Fig 1.4

Step 3: Customize Video Preview

The section above, shows you how easy it is to display a video thumbnail. All we did is configure views to display the preview view mode and Media module did the rest.

But what if you want to change the size of the thumbnail? Luckily Media module makes it easy to change everything within a view mode.

1. Go to Configuration -> "File types" and click on "manage file display" within the Video row.

2. Click on Preview in the top right corner.

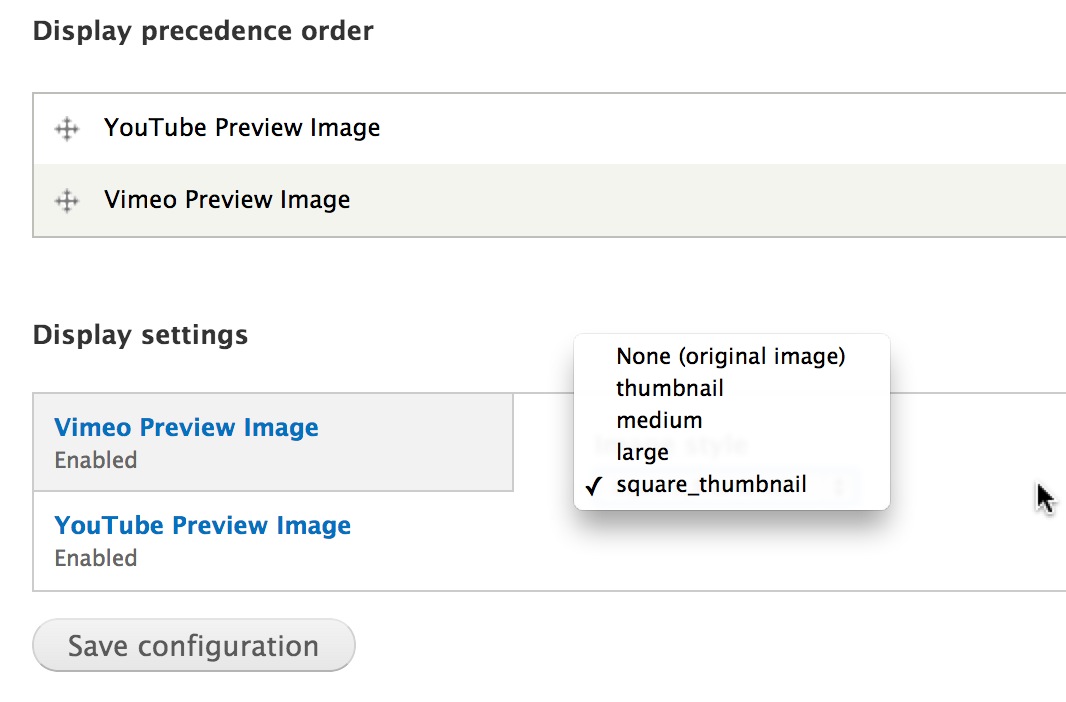
Fig 1.5

3. Scroll to the bottom of the page and select a different image style from the drop-down list.

Fig 1.6
But take note of the warning message on the page:

Fig 1.7

If you're planning on making drastic changes to the preview display, I recommend you create a separate view mode for your custom preview. To define a custom view mode, look at the Entity view modes or Display Suite module.

September 6, 2013

Maximize Your WiFi Range for Free


If you have Internet access set up in your home, you can get the most out of your plan by maximizing your WiFi signal. Here are some handy (and free) tricks to boost your reach.

First, increasing your signal is as easy as moving your home router. Instead of placing it by the TV or cable box, move it to the best place the the house: the attic. It has the least amount of walls and other obstructions, and is a central spot. Additionally, since radio waves spread laterally and down, your attic can be an ideal place for your router.

Need an extra signal boost? Use an aluminum can. Start by removing the pull tab, as well as the bottom of the can. Then, cut the top of the can almost off, leaving only about an inch uncut. Opposite to that, cut the length of the can and pull back the sides. It should roughly resemble a radar dish. Then, by turning the can over and sliding its mouth over your router's antenna, it should give your signal the boost it needs.

So, follow these tips to get the most out of your WiFi. You'll ensure that your signal covers all your home's corners, without reaching into your wallet.

September 5, 2013

Windows System Update Readiness Tool. What is it?

 The System Update Readiness Tool can help fix problems that might prevent Windows updates and service packs from installing. For example, an update might not install if a damaged system file prevents the update from recognizing the version of Windows that's running on your computer.

If your computer is having problems installing an update or a service pack, download and install the tool, which runs automatically. Then, try installing the update or service pack again.


To download and run the System Update Readiness Tool.

1.  Click the link in the table that corresponds to the version of Windows running on your computer.
To find out which version of Windows you're running, and whether it's a 32-bit (x86), 64-bit (x64), or Itanium-based system, click the Start button, right-click Computer, and then click Properties. Note that the System Update Readiness Tool is included as a part of Windows 8 and Windows Server 2012, so we have excluded a download for those platforms.

Windows version                                      Link to Microsoft Download Center

Windows Vista 32-bit (x86)                          Download

Windows Vista 64-bit (x64)                          Download

Windows 7 32-bit (x86)                                Download

Windows 7 64-bit (x64)                                Download

Windows Server 2008 32-bit (x86)                 Download

Windows Server 2008 64-bit (x64)                 Download

Windows Server 2008 Itanium-based             Download

Windows Server 2008 R2 64-bit (x64)            Download

Windows Server 2008 R2 Itanium-based        Download
 

2.  On the Microsoft Download Center webpage, click Download.

If you see a message indicating that validation is required, click Continue and follow the instructions on your screen. Then, click Download.

3.  Do one of the following:

    a.  To install the program immediately, click Open or Run, and then follow the instructions on your screen.

    b.  To install the program later, click Save, and then download the installation file to your computer. When you're ready to install the tool, double-click the file.

4.  In the Windows Update Standalone Installer dialog box, click Yes or OK.

5.  In the Installation complete dialog box, click Close.

8.  Try installing the update or service pack you were trying to install previously.

Note:


The tool can take several minutes to install. Even if the progress bar appears to stop, don't cancel the installation.

September 3, 2013

Android to Windows 8: Top 10 Windows Store Certification Tips

As an Android developer publishing an application in Google Play, you simply publish the app and it appears live.  However, in the Windows Store (and Apple’s App Store), there is a certification process where your application undergoes testing and a review by a human being before being published.

So, you might wonder if there are any tips and tricks for passing certification in the Windows Store.  Here are the top 10 tips that will help you pass certification.

1.  Run the WACK.

The Windows Application Certification Kit (WACK) is an awesome tool.  Perhaps you have developed for an app store before and encountered the really fun cycle of: submit your app, wait, receive a failure notice, fix your bug, re-submit your app, wait, receive a failure notice, fix your bug, re-submit your app, wait…and repeat.

The WACK reduces this cycle by giving you a way to screen your app locally for issues before you even submit it to the Windows Store.  Essentially, the WACK is a series of automated tests (which are also run during certification).  Running them locally, you can find and fix bugs before you submit your app to the Windows Store.

The WACK is installed when you install Visual Studio Express 2012 for Windows 8 (available as a free download here, halfway down the page in blue).  When you install Visual Studio, you should also get a tile in your Start Menu for the WACK (see the picture below).  Finally, here is some how-to documentation on using the WACK.


2.  Test on ARM.

Particularly for the performance requirements, it helps to test on devices running ARM processors and/or low-end machines.  In general, it’s a good idea to test on several different machines.

Also note that your app must provide the same user experience on all processor types that it supports (this is certification requirement 3.2).  If your app has a different user interface or functionality when it runs on different processor types, you must submit a separate app for each processor type and describe the differences in the “Description” section of each app.

Finally, you may be wondering “How do I test on ARM?” since Visual Studio doesn’t run on ARM devices.  You can accomplish this through remote debugging.  Tim Heuer wrote a fabulous post on how to enable remote debugging on an ARM device.

3.  Read the documentation.

I know that this part isn’t fun, but taking some time to read through ALL of the certification requirements will help you avoid mistakes.  Here is the full list of Windows 8 certification requirements.  There is also guidance on avoiding common certification failures and resolving certification errors.

Finally, here is the App Developer Agreement for developers and Windows Store Terms of Use for the users who download your app.


4.  Create an accurate and compelling app listing page.  

When you submit your app to the Windows Store, you will be required to fill out various metadata about your app: a description, age rating, etc.  Take your time and do a good job filling out your application information.  (If you’ve taken the time to write a great app, don’t rush through this part!)  There is a lot of great guidance on this at Preparing your app for the Store (marketing has never been a strength of mine, so I find this really useful).  Here are some specific tips around creating a great app listing page:
  • Make your application description as detailed and descriptive as possible.  There is guidance on creating a great app listing that is truly helpful.
  • Don’t use your listing page to promote your company or products.  Certification requirement 2.3 forbids advertising in an application description, so beware the appearance of trying to sneak advertising into your description.
  • Most apps should have a rating of 12+.  If you’re having trouble deciding between two age ratings for your app, choose the higher one.  Remember that apps never fail certification for having too high a rating.  (See certification requirement 6.2 for more info.)
  • Don’t declare your app as accessible unless you specifically engineer and test it for accessibility scenarios.
  • Make sure that you tell the tester everything that he/she needs to know.  There is a “Notes to Tester” section when you submit an application, and you should utilize that as your mechanism to “talk” to the person who will be reviewing your app for certification.  Besides the obvious items that you should provide (like the username/password of a demo account if your app requires login), you can explain your development choices and how they align to the certification requirements if you feel that anything may be misinterpreted.
5.  Use the Windows Store simulator for testing calls to the Windows Store.

Your app can use the Windows Store commerce APIs from the Windows.ApplicationModel.Store namespace for features like trial functionality or in-app purchases.  If you use these: first of all, test your app to verify that it handles typical exceptions; you can do this using the Windows Store simulator available through the CurrentAppSimulator class.  Then, make sure that you change your app to talk to the real Store and not the simulator before submitting (your app should use the CurrentApp class instead of the CurrentAppSimulator class, which is for testing purposes only).  Finally, ensure that your app doesn’t crash if there’s no network connectivity.

6.  Use the Visual Studio simulator for testing touch as well as different screen sizes, resolutions, and orientations.

A certification tester (and of course, your end users) may be using a machine very different from your development box.  The Visual Studio simulator lets you test your application’s behavior in a variety of conditions.

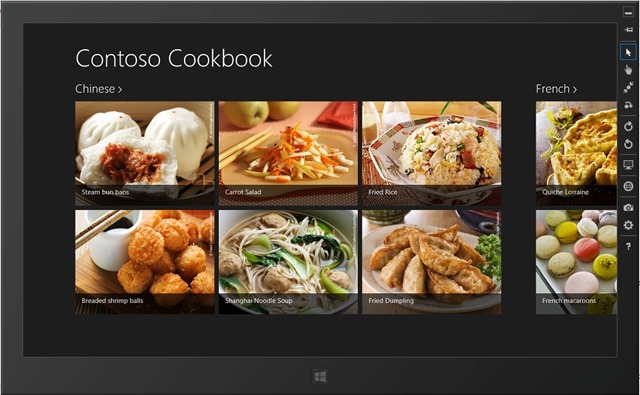
In the Run dropdown menu with the green play button, select “Simulator” (it is probably currently set to “Local Machine”). Then click the button to start the simulator.


When the simulator launches, you will see a menu of buttons on the right-hand side.


Below the minimize button, the buttons are (in order from top to bottom):
  • Pin button – keeps the simulator always on top
  • Arrow button – change to mouse mode
  • Hand button – change to touch mode
  • Zoom button – change to pinch/zoom touch mode (so you can simulate this gesture)
  • Rotate button – change to rotation touch mode (so you can simulate this gesture)
  • Rotate clockwise button – rotates the display clockwise 90 degrees (to simulate portrait/landscape orientation changes)
  • Rotate counterclockwise button – rotates the display counterclockwise 90 degrees
  • Monitor button – changes resolution
  • Globe button – sets location
  • Camera button – copies a screenshot
  • Options button – changes the screenshot settings
  • Question button – links to simulator help
Using the Visual Studio simulator allows you to test how your application will behave across numerous machines.  You can simulate touch if you don’t have a touch machine, orientation changes for slates/tablets, different screen sizes/resolutions, and different locations if you utilize location-based services.

7.  Ensure that your app is fully functional, and won’t be perceived as unfinished.

This maps back to certification requirement 1.2, which says that apps must be fully functional.  A number of things in this category can trigger certification failures:
  • The description given for your app listing page in the Windows Store is inaccurate or overly vague.
  • Any incomplete sections, unimplemented buttons or menu choices, links to webpages that are under construction, empty pages that should contain data, use of language like “coming soon” and “beta”, etc. will give the impression that an app is incomplete.
  • Broken or missing functionality will trigger this failure.
  • Make sure that you provide enough information for the testers to test.  For example, if your app has “login” functionality, create a test user account and provide the username/password in the “Notes to Testers” field when you submit your application.
For more information, see this “1.2 App must be fully functional” blog post.

8.  Test for performance.

Apps must launch in 5 seconds or less and suspend in 2 seconds or less, on a low-power computer.  The Windows App Certification Kit does run performance tests, so you can use that data to measure how your application is performing.  If you find that you do need to improve performance on launch and suspend, here are a few tips:
  • Package content locally (or cache it) when possible, so you don’t have to pull resources from a network during launch.
  • Load and do only what you need on launch.  You can load other data and do other work asynchronously in the background or when you actually need it.
  • Use a “dirty bit” when saving data on suspend, so you only save data that has changed.  (Rather than re-serializing your app’s state if that data hasn’t changed, create a Boolean flag variable (or “dirty bit”) which signals that your data has been modified, and only re-serialize when the data has changed.)
  • Use bytecode caching if you are developing in JavaScript, so each JS file has bytecode created once and not every time the app launches.  To enable this, make sure all JavaScript files are UTF8 encoded with a byte-order mark (BOM) and are statically referenced in the root of your HTML start page.
For more detailed information, see this “3.8 App must meet the basic performance criteria” blog post.

9.  Provide a privacy policy if your app connects to the internet at all (or if you have the Internet capability checked).

This is an extremely common reason for Windows Store submission failure.  The “Internet (Client)” capability is enabled by default in the Visual Studio templates, so by default if you haven’t changed your manifest, you do have to provide a privacy policy.  The capabilities are found in your Package.appxmanifest file, under the Capabilities tab:


If you are not using the internet, uncheck this capability, and you don’t have to provide a privacy policy.  If you are using the internet, you need to create a privacy policy that explains what data is sent over the internet/what you are doing with it, post the privacy policy online, link to it in your application’s settings (accessed through the Settings charm), and provide the link when submitting to the Windows Store.  If you do collect personal information, the user has to opt-in and give consent to share this information.
For more detailed information, see this “4.1 App must comply with privacy requirements” blog post.

10.  Properly localize your app for all languages that it supports.

Here are some common “gotchas” that can cause the localization certification requirement to fail:
  • The app’s metadata provided during the submission process on the Description page (such as its description, features, keywords, or screen shots) is either missing or doesn’t match the languages defined in your application.  For example, you may accidentally provide a description in English for the Chinese version of the app.
  • Don’t forget to provide localized screen shots!  This one has tripped up a lot of folks.
  • The app must support one of the certification languages.  That is the subset of languages for which we have testers to confirm that your app meets the certification requirements.
  • Make sure that the app is functional and complete for all of the languages that you claim.  If any claimed language support is incomplete, this requirement will fail.
For more information (including the difference between supporting languages and markets, and how to implement support for different languages properly), see this “6.5 App must be localized” blog post.
Hope these tips were useful!

September 1, 2013

The Most Dangerous Search Engine on the Internet

Unlike Google, which crawls the Web looking for websites, Shodan navigates the Internet's back channels. It's a kind of "dark" Google, looking for the servers, webcams, printers, routers and all the other stuff that is connected to and makes up the Internet.
 
Shodan runs 24/7 and collects information on about 500 million connected devices and services each month.

It's stunning what can be found with a simple search on Shodan. Countless traffic lights, security cameras, home automation devices and heating systems are connected to the Internet and easy to spot. Shodan searchers have found control systems for a water park, a gas station, a hotel wine cooler and a crematorium. Cybersecurity researchers have even located command and control systems for nuclear power plants and a particle-accelerating cyclotron by using Shodan.

What's really noteworthy about Shodan's ability to find all of this -- and what makes Shodan so dangerous -- is that very few of those devices have any kind of security built into them.

"It's a massive security failure," said HD Moore, chief security officer of Rapid 7, who operates a private version of a Shodan-like database for his own research purposes.
 
A quick search for "default password" reveals countless printers, servers and system control devices that use "admin" as their user name and "1234" as their password. Many more connected systems require no credentials at all -- all you need is a Web browser to connect to them.

In a speech given at last year's Defcon cybersecurity conference, independent security penetration tester Dan Tentler demonstrated how he used Shodan to find control systems for evaporative coolers, pressurized water heaters, and garage doors.

He found a car wash that could be turned on and off and a hockey rink in Denmark that could be defrosted with a click of a button. A city's entire traffic control system was connected to the Internet and could be put into "test mode" with a single command entry. And he also found a control system for a hydroelectric plant in France with two turbines generating 3 megawatts each.

Dangerous stuff, if it got into the wrong hands.

"You could really do some serious damage with this," Tentler said, in an understatement.

So why are all these devices connected with few safeguards? Some things that are designed to be connected to the Internet, such as door locks that can be controlled with your iPhone, are generally believed to be hard to find. Security is an afterthought.
 
A bigger issue is that many of these devices shouldn't even be online at all. Companies will often buy systems that can enable them to control, say, a heating system with a computer. How do they connect the computer to the heating system? Rather than connect them directly, many IT departments just plug them both into a Web server, inadvertently sharing them with the rest of the world.

"Of course there's no security on these things," said Matherly, "They don't belong on the Internet in the first place."

The good news is that Shodan is almost exclusively used for good.

Matherly, who completed Shodan more than three years ago as a pet project, has limited searches to just 10 results without an account, and 50 with an account. If you want to see everything Shodan has to offer, Matherly requires more information about what you're hoping to achieve -- and a payment.

Penetration testers, security professionals, academic researchers and law enforcement agencies are the primary users of Shodan. Bad actors may use it as a starting point, Matherly admits. But he added that cybercriminals typically have access to botnets -- large collections of infected computers -- that are able to achieve the same task without detection.

To date, most cyberattacks have focused on stealing money and intellectual property. Bad guys haven't yet tried to do harm by blowing up a building or killing the traffic lights in a city.

Security professionals are hoping to avoid that scenario by spotting these unsecured, connected devices and services using Shodan, and alerting those operating them that they're vulnerable. In the meantime, there are too many terrifying things connected to the Internet with no security to speak of just waiting to be attacked. To top of page