November 28, 2008

Zango Removal Instructions and Help

What is Zango?

Zango is a entertainment site with free access to videos, music, games, and other downloads. The site is free to all users, but is paid for by advertisements. Visitors are presented with an end user license agreement that they accept before downloading any content.

Zango does display popup advertisements and such to pay for the games and videos. The Zango software includes a search assistant and toolbar. Since the software does not collect or share any information about users they are not considered spyware but rather adware. Advertiser sponsored free software that anyone can view and play as long as they are willing to view the ads that go along with it.

If you want Zango installed on your computer, you can visit their site.

How Do I Know If I Have Zango Installed?
You'll notice the following toolbar in your browser if Zango is installed on your computer.
Zango Toolbar
as well as the following icon in your system tray
Zango System Tray icon

If you run Hijackthis, you'll also notice the following lines that have been added:
C:\Program Files\Zango\zango.exe
C:\Program Files\ZangoToolbar\Bin\4.8.3.0\ZbSrv.exe

O2 - BHO: Zango Search Assistant Helper /fleok=1D8A83A5C5E0117D9CA975760EA83FA5EF80752B94E2DE765D754E2937C3 - {56F1D444-11BF-4879-A12B-79CF0177F038} - c:\program files\zango\zangohook.dll

O2 - BHO: Zango Toolbar - {5CBE2611-C31B-401F-89BC-4CBB25E853D7} - C:\Program Files\ZangoToolbar\Bin\4.8.3.0\ZbHostIE.dll

O3 - Toolbar: Zango Toolbar - {5CBE2611-C31B-401F-89BC-4CBB25E853D7} - C:\Program Files\ZangoToolbar\Bin\4.8.3.0\ZbHostIE.dll

O4 - HKLM\..\Run: [zango] "c:\program files\zango\zango.exe"

How Do I Remove Zango?
1) Click on Start, Settings, Control Panel

2) Double click on Add/Remove Programs
3) Find "Zango" in the list of installed programs and click on Change/Remove to uninstall it. There may also be a program called Media Gateway, remove it as well.
Zango uninstall information

You'll be presented with the following screen during the uninstall process, you'll want to check either the Zango toolbar or Search Assistant, or both before clicking Next to complete the uninstall.

Zango uninstall

4) Reboot your Computer and run HijackThis.

5) With HijackThis, scan for and fix any of the entries shown above that may be remaining.

6) Zango should now be completely uninstalled from your computer.

7) If for any reason, Zango did not completely uninstall, click on the following link to download and run the uninstaller.


If you decide later you want to play the games or watch the videos on Zango's site, you'll have to reinstall their software.

How to Remove Norton Antivirus and Security Products

One of the most frequently asked questions how to uninstall Norton or McAfee antivirus and security products. Maybe its because trial versions of these products were preinstalled when the customer purchased the computer, or maybe you want to uninstall Norton Antivirus and install another antivirus software product.

Other computer users may be trying to install an antivirus product and they are told to uninstall Norton before they can proceed even though it appears Symantec products are not running on the system.

It's also amazing how many viruses attack Norton and Symantec products especially and disable them so they can wreck havoc on the computer.

My personal experience with Norton Antivirus has been mostly positive. However, each successive version seems to incorporate more functionality but it gets slower and slower. One of the best ways always is to uninstall Norton and install a free antivirus product. I've also experienced situations where internet access is completely shut down and many times uninstalling all of the Norton Antivirus or firewall products on the computer fixes this issue.

Follow the instructions below to safely remove Norton and Symantec security products including their antivirus and firewall from your computer

Removal through the Add/Remove Programs Control Panel

In many cases, you can simply remove Norton products through the Add/Remove Control Panel.

1) Click on Start, then click on Control Panel.

2) Double-click on Add or Remove Programs.

3) Find the Symantec or Norton product listed and click on it.

4) Click on Remove.

5) The click the Remove All button to start the removal process.

6) Once the removal process completes, you'll be asked to restart the computer. Go ahead and reboot at that time.

7) After rebooting, Norton should be removed from your system.

If for some reason, the normal uninstall does not remove it, I recommend following the automatic uninstall instructions below to remove any leftover Symantec or Norton security products.

Removing Norton Automatically

Norton has created an automatic removal program to remove the following software products when the normal removal methods fail. Warning: if you use ACT! or WinFAX, back up those databases and uninstall those products as well. The removal tool will remove the following software products from your computer.

* Norton AntiSpam 2004 - 2005
* Norton Antivirus 2003 - 2007.2
* Norton Ghost 2003, 9.0, and 10.0
* Norton GoBack 3.1 - 4.2
* Norton Internet Security 2003 - 2007.2
* Norton Password Manager
* Norton Personal Firewall 2003 - 2006
* Norton SystemWorks 2003 - 2007
* Norton Confidential Online 2007
* Norton Internet Security 2007 Add-on Pack
* Norton Save and Restore 1.0 - 2.0
* Norton 360

Follow these directions to download the Norton Removal Tool and run it to remove the above programs.

1. Click on the following link to download the Norton removal tool

ftp://ftp.symantec.com/public/english_us_canada/removal_tools/Norton_Removal_Tool.exe

2. Click Save and save the file to your desktop.

3. Close all Norton Application windows you may have open, and double-click on Norton_Removal_Tool.exe to start the removal tool. Windows Vista users will have to right-click on the file and select "Run as Administrator".

4. After the removal tool finishes, you should be prompted to restart your computer.

5. Once the computer restarts, your Norton product should be uninstalled.

Create Dazzling Photo Effects for FREE Using Your Browser

Want to create cool digital photo effects but are a bit intimidated with more complex editors such as Photoshop? Try the world's most advanced image editor for FREE... click here to use if FREE!!

November 1, 2008

Send Your Pictures From Phone to Computer

We all know that cell phones are one of today's big crazes. An even bigger one is camera cell phones. Before we know it, all cell phones will probably have camera abilities, because the world today likes to see real images rather than just words. So, it may be a good idea to know what you can do with the pictures you take on your phone after the shooting is done.

Picture Messaging

A common way that people transfer photos from their cell phones to their computers (that doesn't really have any additional cost from your regular monthly bill) is picture messaging. It works pretty much the same as text messaging; you just have to have text messaging enabled on your cell phone. If you don't, this method will not work.

Note: Expect this method to be a little different for various phone models, but the following directions are pretty basic and similar for all phones.

If you would like to send a picture to another person's cell phone or if you want to e-mail a picture to a friend or even to yourself, you just need to open your phone and go to the Menu. Find your phone's Media Gallery and then choose Pictures. At this point, you can pick the photo you'd like to send. Once you have it chosen, go to Options and choose Send in Message (like you're sending a text message). This is where you choose to send it to one of the Contacts listed in your phone or if you want to e-mail it to someone or yourself. Pick the person you're sending it to and push the OK button and then Send.

You can also send text with the picture if you want to do that. If you end up e-mailing the picture to someone, you will just have to type in their e-mail address and they will get it in their Inbox. You just need to make sure the person you're sending the picture to has picture capabilities too.

Data Cable

Another way you can transfer photos to other people is to put them directly onto your computer, so you can e-mail them to your friends or save them to a disk or a CD. So, to do that, you have to have some sort of a USB data connection kit, which comes with the cable cord that plugs your phone into your computer's USB port and the software that will help you in transferring the pictures from your phone. You usually have to purchase these kits separate from your phone. The store where you buy your phone should have them available and they will be able to tell you which one will work with your type of phone.

Once you have your phone and computer connected, you can start transferring the pictures. Again, keep in mind that these kits are phone specific, so you need to make sure that you get one that will be compatible with your phone model.

Bluetooth

Another way to handle the pictures on your cell phone that is becoming more popular every day is a wireless technology called Bluetooth. Bluetooth works with short-range wireless technologies that allow you to easily send photos from your phone to a laptop or desktop computer. The computer you are sending them to just has to be equipped to accept the pictures.

The most difficult (but it can sometimes be fairly easy) part about Bluetooth is matching the phone to the computer, so they are both compatible with each other. But, once that it is done, sending the images couldn't be easier.

As long as your phone has the Bluetooth software on it, you can send the images without any extra charges billed to you. You can also send photos to other Bluetooth users' phones without any wires or additional charges. This seems to be the most versatile way to go if you're looking to maybe spend a little more money up front for the Bluetooth works, but it will save you money in the long run when you don't have to pay any extra charges when sending your pictures back and forth.

E-mail

Another way for you to send pictures between your friends and family is to e-mail them. Your cell phone has to have e-mail capabilities for this to work, but a lot of the phones these days come with that ability. You can e-mail them to other people or, as mentioned above, to yourself. You just have to type the e-mail address in the To: field just like you would if you were using Outlook Express and it will be sent.

If you see something while you're out and about that you just have to take a picture of, you can snap the photo on your phone, send yourself a quick e-mail and when you get home, the picture will be on your computer waiting for you. You can then send it off to other people or do something like set it as your desktop wallpaper.

Removable Memory Cards

Another new technology that is presenting itself with camera phones is an external memory card for your phone. The phone just comes with a slot for the card and you can transfer the shots to your computer in a snap. You will need to purchase an external memory card reader so it will all work, but it's one of the easiest ways to go if you takes several pictures with your cell phone.

When you have the card reader installed, you just remove the memory card from your phone, insert it into the reader and your computer will recognize it as another drive. You can then drag and drop the photos wherever you want them to go, e-mail them to others, etc. The options are pretty endless with this choice. You can then get rid of the existing pictures on your phone (since they're on your computer and not lost) and go out and take more. It's that easy!

Just one more reminder: all of these applications work differently with different phones, so make sure you refer to your phone's manual before doing anything you're not sure of.

October 3, 2008

Add Your Logo To A Video File For FREE!

Many people like to add their logo or their URL to video files. I will show you how to add a professional looking transparent logo to your video files using a free program called VirtualDub which is the best free program to work with AVIs (like DIVX, XVID or any other AVI format). You can use the same technique to add a picture or a text using VirtualDub.

  • Prepare your logo by opening your favorite image editor and making a new image file, try to use a suitable dimensions and suitable color that will look good in the final video also make it as simple and as small as possible.
  • Fill all the areas that you want to be transparent with black.
  • Save the image as bmp, jpg or tga.

    add_logo_4 (1K)
  • Open VirtualDub, Drag and Drop your video on it.

  • add_logo_1 (23K)


  • Click Video > Full processing mode.
  • Click Video > Filters or (Ctrl + F).
  • In the Filters window, click Add.
  • In the "Add Filter" window scroll down to logo and double click on it or choose it and click Ok.
  • In the "filter: logo" window click "Logo image" and browse to the logo image you have created.
  • Check the three check boxes: "Enable per-pixel alpha blending…", "Use premultiplied alpha…" and "Use gray channel…".
  • In the "Alpha image" browse to the same image file again.
  • Click the "Show preview" button, you should now see your logo on the video.
  • Change the "X offset" and "Y offset" to change the position of your logo.

  • add_logo_2 (25K)

  • You can also change the Opacity value if you like your logo to be semi transparent, you should see the results immediately in the "Filter preview" window.
  • Click Ok twice to return to the main window, press (Ctrl + P) or click Video > Compression to choose a video compression - like Divx - and press F7 to save the video file.Here is the final result:

  • add_logo_3 (24K)

    .NET Framework Cleanup Tool User's Guide

    This .NET Framework cleanup tool is designed to automatically perform a set of steps to remove selected versions of the .NET Framework from a computer. It will remove files, directories, registry keys and values and Windows Installer product registration information for the .NET Framework. The tool is intended primarily to return your system to a known (relatively clean) state in case you are encountering .NET Framework installation, uninstallation, repair or patching errors so that you can try to install again.

    There are a couple of very important caveats that you should review before using this tool to remove any version of the .NET Framework from your system:

    • This tool is designed as a last resort for cases where install, uninstall, repair or patch installation did not succeed for unusual reasons. It is not a substitute for the standard uninstall procedure.
    • This cleanup tool will delete shared files and registry keys used by other versions of the .NET Framework. If you run the cleanup tool, you will need to perform a repair/re-install for all other versions of the .NET Framework that are on your computer or they will not work correctly afterwards.

    Download locations

    The .NET Framework cleanup tool is available for download at the following locations:

    The copy of the tool is the same at both locations. There are 2 locations so that the tool can still be downloaded even if one of the sites is temporarily unavailable.

    The .zip file that contains the tool also contains a file named history.txt that lists when the most recent version of the tool was published and what changes have been made to the tool over time.

    Supported products

    The .NET Framework cleanup tool supports removing the following products:

    • .NET Framework - All Versions
    • .NET Framework - All Versions (Tablet PC and Media Center)
    • .NET Framework - All Versions (Windows Server 2003)
    • .NET Framework - All Versions (Windows Vista and Windows Server 2008)
    • .NET Framework 1.0
    • .NET Framework 1.1
    • .NET Framework 2.0
    • .NET Framework 3.0
    • .NET Framework 3.5

    Not all of the above products will appear in the UI for the .NET Framework cleanup tool on every operating system. The cleanup tool contains logic so that if it is run on an OS version that includes the .NET Framework as an OS component, it will not offer the option to clean it up. This means that running the cleanup tool on Windows XP Media Center Edition or Tablet PC Edition will not offer the option to clean up the .NET Framework 1.0, running it on Windows Server 2003 will not offer the option to clean up the .NET Framework 1.1 and running it on Windows Vista or Windows Server 2008 will not offer the option to clean up the .NET Framework 2.0 or the .NET Framework 3.0.

    When choosing to remove any of the above versions of the .NET Framework, the cleanup tool will also remove any associated hotfixes and service packs. You do not need to run any separate steps to remove the service pack(s) for a version of the .NET Framework.

    Silent installation mode

    The .NET Framework cleanup tool supports running in silent mode. In this mode, the tool will run without showing any UI, and the user must pass in a version of the .NET Framework to remove as a command line parameter. To run the cleanup tool in silent mode, you need to download the cleanup tool, extract the file cleanup_tool.exe from the zip file, and then run it using syntax like the following:

    cleanup_tool.exe /q:a /c:"cleanup.exe /p "

    The value that you pass with the /p switch to replace in this example must exactly match one of the products listed in the Supported products section above. For example, if you would like to run the cleanup tool in silent mode and remove the .NET Framework 1.1, you would use a command line like the following:

    cleanup_tool.exe /q:a /c:"cleanup.exe /p .NET Framework 1.1"

    One important note – as indicated above, the cleanup tool will not allow you to remove a version of the .NET Framework that is installed as part of the OS it is running on. That means that even if you try this example command line on Windows Server 2003, the tool will exit with a failure return code and not allow you to remove the .NET Framework 1.1 because it is a part of that OS.

    Similarly, you cannot use the cleanup tool to remove the .NET Framework 1.0 from Windows XP Media Center Edition or Windows XP Tablet PC Edition or remove the .NET Framework 2.0 or 3.0 from Windows Vista or Windows Server 2008. In addition, if you run the cleanup tool on an OS that has any edition of the .NET Framework installed as a part of the OS, it will prevent you from using the .NET Framework - All Versions option because there is at least one version that it cannot remove.

    If you are planning to run the cleanup tool in silent mode, you need to make sure to detect what OS it is running on and not pass in a version of the .NET Framework with the /p switch that is a part of the OS or make sure that you know how to handle the failure exit code that you will get back from the cleanup tool in that type of scenario.

    Unattended installation mode

    The .NET Framework cleanup tool supports running in silent mode. In this mode, the tool will run and only show a progress dialog during removal, but will require no user interaction. Unattended mode requires the user to pass in a version of the .NET Framework to remove as a command line parameter. To run the cleanup tool in unattended mode, you need to download the cleanup tool, extract the file cleanup_tool.exe from the zip file, and then run it using syntax like the following:

    cleanup_tool.exe /q:a /c:"cleanup.exe /p /u"

    For example, if you would like to run the cleanup tool in unattended mode and remove the .NET Framework 1.1, you would use a command line like the following:

    cleanup_tool.exe /q:a /c:"cleanup.exe /p .NET Framework 1.1 /u"

    Exit codes

    The cleanup tool can returns the following exit codes:

    • 0 - cleanup completed successfully for the specified product
    • 3010 - cleanup completed successfully for the specified product and a reboot is required to complete the cleanup process
    • 1 - cleanup tool requires administrative privileges on the machine
    • 2 - the required file cleanup.ini was not found in the same path as cleanup.exe
    • 3 - a product name was passed in that cannot be removed because it is a part of the OS on the system that the cleanup tool is running on
    • 4 - a product name was passed in that does not exist in cleanup.ini
    • 100 - cleanup was able to start but failed during the cleanup process
    • 1602 - cleanup was cancelled

    Log files

    The cleanup tool creates the following log files:

    • %temp%\cleanup_main.log - a log of all activity during each run of the cleanup tool; this is a superset of the logs listed below as well as some additional information
    • %temp%\cleanup_actions.log - a log of actions taken during removal of each product; it will list files that it finds and removes, product codes it tries to remove, registry entries it tries to remove, etc.
    • %temp%\cleanup_errors.log - a log of errors and warnings encountered druing each run of the cleanup tool

    How To Capture A Frame From Any Video File

    To capture a screen of any window you have one of two options: either you press the Print Screen key on your key board (or Print Scrn) to capture the whole desktop or press (Alt + Print Scrn) to capture only the active window. Black area? Read how to fix this.


  • Open the video file using your favorite software.
  • Press (Alt + Print Scrn) together on your key board, now you have copied the active window to the clipboard.


  • Open Paint by going to Start -> All Programs -> Accessories -> Paint.


  • Click on Edit -> Paste (Ctrl + V) to paste your captured window, now you should see the picture, go to File -> Save (Ctrl + S) to save the file.

  • Print Screen 1

    Easy? yes. But what is that? you have the whole window but not the video! Instead you have a black area where the captured frame should be, why?

    Because your video card doesn't use your computers memory for playing frames! (Sounds strange?) Instead it uses its own memory to speed things up for much better performance and only uses the area where you see the video as an empty window for the video to appear. When you pressed the (Alt + Print Scrn) keys, you copied the contents of the Ram of your computer assigned to the window, that is why you saw a black area instead of the video frame. Try moving the Paint window and you will see parts of the video frame while moving if you still have the video open (I told you it is just like an open window) but of course it will not be saved with a file, just black area instead of the video frame.
    So what shall we do? I will tell you what to do without buying any additional software, just using Windows!
    To do that, we have to stop our video card from using its memory and force it to use our computer's ram until we capture the video frames and set it back to normal again, here is how:


  • Right click on any empty place on your desktop and choose Properties from the popup menu.


  • The Display properties window will open, now choose the Settings tab (located at the top right).


  • Click on Advanced button.


  • Print Screen 2


  • A new window will open now choose Troubleshoot tab.


  • Move the Hardware Acceleration slider to the left (None).


  • Click on the Apply button for your changes to take effect without closing the window.


  • Print Screen 3


  • Open the video file and capture the frame by doing the above four steps again.


  • We now can see a video frame instead of this black area, now save the file.


  • Repeat the top four steps to capture as many frames as you like.

    Print Screen 4


  • Move the hardware slider to right (Full) press Ok and Ok again in the Display Properties window to revert every thing back to normal and close all open windows.
  • October 2, 2008

    Free your RAM and improve system performance

    1) Start any application, say Excel. Open some large documents.


    2) Now go to Windows Task Manager and click Processes tab and sort the list in descending order on Mem Usage. You will notice that excel will be somewhere at the top, using multiple MBs of memory.

    3) Now switch to excel and simply minimize it. (Don’t use the Minimize All Windows option of the task bar).


    4) Now go back to the Windows Task Manager and see where excel is listed. Most probably you will not find it at the top. You will typically have to scroll to the bottom of the list to find excel. Now check out the amount of RAM it is using. Surprised? The memory utilization has reduced by a huge amount.


    5) Minimize each application that you are currently not working on by clicking on the Minimize button & you can increase the amount of available RAM by a substantial margin. Depending upon the number and type of applications you use together, the difference can be as much as 50 percent of extra RAM. In any multitasking system, minimizing an application means that it won’t be utilized by the user right now. Therefore, the OS automatically makes the application use virtual memory & keeps bare minimum amounts of the code in physical RAM.


    Make Your XP Look Like Mac OSX

    So you want your to look like a Mac OSX. There are two ways to accomplish the OSX look: the easy way - with a transformation pack, and the hard way - manually. I will, of course, show you how to do this the easy way:

    Step 1: Get a transformation pack.

    The best Mac OSX transformation pack for Windows XP is probably FlyakiteOSX. The creator’s website itself is worth the visit, but if it doesn’t load in your browser, get Firefox, and here’s a download link.

    Step 2: Install

    Run the installer and when you get to the following screen, MAKE SURE you check the box Create System Restore Point. The transformation pack will change a lot of system files and settings and although you should be able to uninstall easily later, you might find yourself in a mess if something goes wrong. This way you can always do a System Restore. Check any other options you want and you’re ready!


    How to make your XP look like Mac OSX - xptricks.net

    Step 3: Enjoy!

    After the restart, you should be able to convince all, but the most die-hard Mac lovers, that you have an OSX. This is what your desktop should look like now:

    How to make your XP look like Mac OSX

    Like other good transformation packs this also leaves you a nice Mac OSX shutdown screen:

    How to make your XP look like Mac OSX

    …And a Mac OSX logon screen:

    How to make your XP look like Mac OSX - xptricks.net

    Note: The transformation pack might trigger your anti-virus protection as it changes some system files, but this is probably a false positive. Be careful though, and remember to back up!

    September 29, 2008

    Top 21 Firefox 3 Compatible Themes

    If you were using a customized theme on your Firefox 2 and have just upgraded over to Firefox 3, you might not want to settle with the default Firefox theme your peers have on their desktop. Firefox 3 may be new, but theme designers already have their muscles all flexed up. Here’s 21 Firefox 3 compatible themes to make your browser a little bit different from the rest.

    Office 2007 Black

    office
    Download [ Office 2007 Black]

    iPox

    ipox
    Download [ iPox ]

    Flook

    flook
    Download [ Flook ]

    Vista Aero

    vista aero
    download [ Vista Aero ]

    MacOSX Theme

    macosx
    Download [ MacOSX theme ]

    Kampelton

    kampelton
    download [ kampelton ]

    iFox Graphite

    ifox
    Download [ iFox Graphite ]

    Gradient iCool

    icool
    Download [ Gradient iCool ]

    Camifox

    camifox
    Download [ camifox ]

    Firefox 2 Theme

    FF2
    Download [ Firefox 2 theme ]

    Aero Fox

    aero fox
    Download [ Aero Fox ]

    Aero Fox Silver

    aero fox silver
    Download [ Aero Fox Silver ]

    BlackX 2

    blackx 2
    Download [ BlackX 2 ]

    SKY

    SKY
    Download [ SKY ]

    NASA Night Launch

    NASA
    Download [ Nasa Night Launch ]

    MyFireFox

    myfirefox
    Download [ My FireFox ]

    Qute 3.3

    qute
    Download [ Qute 3.3 ]

    Blue Ice 2.1

    blue ice
    Download [ Blue Ice ]

    Pitch Dark

    black
    Download [ Pitch Dark ]

    Silvermel

    silvermel
    Download [ Silvermel ]

    Noia 2.0 (Extreme)

    Download [Noia 2.0 Extreme]

    Download Social Music, Video & More…for FREE

    Orbit Downloader, leader of download manager revolution, is devoted to new generation web (web2.0) downloading, such as video/music/streaming media from Myspace, YouTube, Imeem, Pandora, Rapidshare, support RTMP. And to make general downloading easier and faster.

    Current version : 2.7.6 No adware! No spyware!

    Why use Orbit Downloader?


    • Download Rich Media: Streaming Media, RTMP, Social Music & Video

      Orbit Downloader supports HTTP/FTP/HTTPS/RTSP/MMS/RTMP protocols and provides a total solution to download rich media. So Orbit Downloader can be used as YouTube downloader to download YouTube more simply and easily. Additionally, you can download music and video from social music/video websites like YouTube.

    • Great Speed: Up to The Fastest Download Manager

      Orbit Downloader is based on p2p and multi-source downloading technology. More Efficient mirrors selection algorithm and faster download sources which allows you to download files up to 500% faster than before. Maximum possible download speed, up to the fastest download manager!

    • Super Light: Micro-sized and Resource-friendly

      Orbit Downloader is written with efficiency in mind, it typically uses less than 3MB of memory and 3% of cpu when downloading. Additionally, the installation package is less than 2MB.

    • Support RapidShare

      Orbit Downloader supports most of the file-sharing service websites, including megaupload, badongo, sendspace, sexuploader, yourfilehost, uploading, filefront, 4shared, turboupload, depositfiles, filefactory, and more.

    • Easy to Use

      Orbit Downloader has a simple and clear user interface. It is easy to use and configure for both newbies and professionals.

    • Free and Safe

      100% free and no registration required. No adware!!! No spyware!!!

    September 27, 2008

    How to hide files in JPEG pictures

    Here we're going to show you a new way to hide files that is very counter-intuitive and therefore pretty safe! Using a simple trick in Windows, you can actually hide a file inside of the JPG picture file!

    You can actually hide any type of file inside of an image file, including txt, exe, mp3, avi, or whatever else. Not only that, you can actually store many files inside of single JPG file, not just one! This can come in very handy if you need to hide files and don’t want to bother with encryption and all that other technical stuff.

    Hide File in Picture 

    In order to accomplish this task, you will need to have either WinZip or WinRAR installed on your computer. You can download either of these two off the Internet and use them without having to pay anything. Here are the steps for creating your hidden stash:
    • Create a folder on your hard drive, i.e. C:\Test and put in all of the files that you want to hide into that folder. Also, place the image that you will be using to hide the files in.
    hide file in jpg
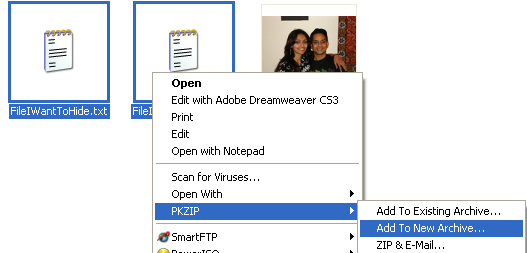
    • Now select all of the files that you want to hide, right-click on them, and choose the option to add them to a compressed ZIP or RAR file. Only select the files you want to hide, not the picture. Name it whatever you want, i,e. “Hidden.rar”.
    add to archive
    • Now you should have a folder that looks something like this with files, a JPG image, and a compressed archive:
    hidden rar
    • Now here’s the fun part! Click on Start, and then click on Run. Type in “CMD” without the quotes and press Enter. You should now see the command prompt window open. Type in “CD \” to get to the root directory. Then type CD and the directory name that you created, i.e. “CD Test“.
    cd test
    • Now type in the following line: “copy /b DSC06578.JPG + Hidden.rar DSC06578.jpg” and press Enter. Do not use the quotes. You should get a response like below:
    hide files in jpg

    Just make sure that you check the file extension on the compressed file, whether it is .ZIP or .RAR as you have to type out the entire file name with extension in the command. I have heard that some people say that they have had problems doing this with a .ZIP extension, so if that doesn’t work, make sure to compress to a .RAR file.

    And that’s it! The picture file will have been updated with the compressed archive inside! You can actually check the size of the picture and see that it has increased by the same amount as the size of the archive.

    You can access your hidden file in two ways. Firstly, simply change the extension to .RAR and open the file using WinRAR. Secondly, you can just right-click on the JPG image and choose Open With and then scroll down to WinRAR. Either way, you’ll see your hidden files show up that you can then extract out.

    winrar

    That’s it! That is all it takes to hide files inside JPG picture files! It’s a great way simply because not many people know it’s possible and no one even thinks about a picture as having to the ability to “hide” files.

    SHOUTcast on your PC

    If you’re a radio fanatic or even just a fan, you’re going to love SHOUTcast! SHOUTcast allows you to listen to any radio station found on the Internet. If that sounds good to you, here’s how you can get it!

    Getting Winamp

    For starters, you’re going to need the Winamp Media Player. To get Winamp, head on over to www.winamp.com and click on the Free Download button. Then click Run (or Save if you’re using Firefox) and install it.

    I recommend unchecking the boxes for the additional features you can get, such as the Winamp toolbar. I don't know about you, but the last thing I need is another toolbar!

    Now, just sit back, relax and allow the program to install.

    Once Winamp is installed, head over to www.shoutcast.com and choose a radio station you would like to listen to. For example, let’s try NPR (National Public Radio).

    Of course, NPR transmits from many different places, so for now, let’s just stick with the non-localized version.

    Next to the radio station, click on Tune In. If your computer starts playing the station, you’re good to go. On the other hand, if yours opens something else, here’s what you can do:

    1.) Right click on Tune In.

    2.) Choose Properties.

    3.) Highlight the link’s address and copy it (Ctrl + C).

    4.) Now, open Winamp and click on Add, Add URL.

    5.) Press Ctrl + V to paste the link you copied from the SHOUTcast Web site.

    6.) Click Open and you’re done.

    You can also use SHOUTcast to pick up independent radio or stations from another part of the world. Isn’t technology amazing? Happy listening!