


 02:33
02:33
 Admin
Admin

As an Android developer publishing an application in Google Play, you
simply publish the app and it appears live. However, in the Windows
Store (and Apple’s App Store), there is a certification process where
your application undergoes testing and a review by a human being before
being published.
So, you might wonder if there are any tips and tricks for passing certification in the Windows Store. Here are the top 10 tips that will help you pass certification.
1. Run the WACK.
The Windows Application Certification Kit (WACK) is an awesome tool. Perhaps you have developed for an app store before and encountered the really fun cycle of: submit your app, wait, receive a failure notice, fix your bug, re-submit your app, wait, receive a failure notice, fix your bug, re-submit your app, wait…and repeat.
The WACK reduces this cycle by giving you a way to screen your app locally for issues before you even submit it to the Windows Store. Essentially, the WACK is a series of automated tests (which are also run during certification). Running them locally, you can find and fix bugs before you submit your app to the Windows Store.
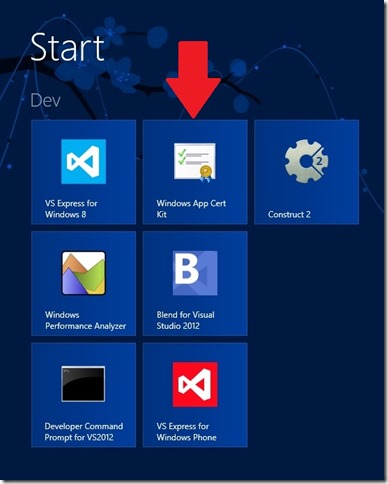
The WACK is installed when you install Visual Studio Express 2012 for Windows 8 (available as a free download here, halfway down the page in blue). When you install Visual Studio, you should also get a tile in your Start Menu for the WACK (see the picture below). Finally, here is some how-to documentation on using the WACK.

2. Test on ARM.
Particularly for the performance requirements, it helps to test on devices running ARM processors and/or low-end machines. In general, it’s a good idea to test on several different machines.
Also note that your app must provide the same user experience on all processor types that it supports (this is certification requirement 3.2). If your app has a different user interface or functionality when it runs on different processor types, you must submit a separate app for each processor type and describe the differences in the “Description” section of each app.
Finally, you may be wondering “How do I test on ARM?” since Visual Studio doesn’t run on ARM devices. You can accomplish this through remote debugging. Tim Heuer wrote a fabulous post on how to enable remote debugging on an ARM device.
3. Read the documentation.
I know that this part isn’t fun, but taking some time to read through ALL of the certification requirements will help you avoid mistakes. Here is the full list of Windows 8 certification requirements. There is also guidance on avoiding common certification failures and resolving certification errors.
Finally, here is the App Developer Agreement for developers and Windows Store Terms of Use for the users who download your app.
4. Create an accurate and compelling app listing page.
When you submit your app to the Windows Store, you will be required to fill out various metadata about your app: a description, age rating, etc. Take your time and do a good job filling out your application information. (If you’ve taken the time to write a great app, don’t rush through this part!) There is a lot of great guidance on this at Preparing your app for the Store (marketing has never been a strength of mine, so I find this really useful). Here are some specific tips around creating a great app listing page:
Your app can use the Windows Store commerce APIs from the Windows.ApplicationModel.Store namespace for features like trial functionality or in-app purchases. If you use these: first of all, test your app to verify that it handles typical exceptions; you can do this using the Windows Store simulator available through the CurrentAppSimulator class. Then, make sure that you change your app to talk to the real Store and not the simulator before submitting (your app should use the CurrentApp class instead of the CurrentAppSimulator class, which is for testing purposes only). Finally, ensure that your app doesn’t crash if there’s no network connectivity.
6. Use the Visual Studio simulator for testing touch as well as different screen sizes, resolutions, and orientations.
A certification tester (and of course, your end users) may be using a machine very different from your development box. The Visual Studio simulator lets you test your application’s behavior in a variety of conditions.
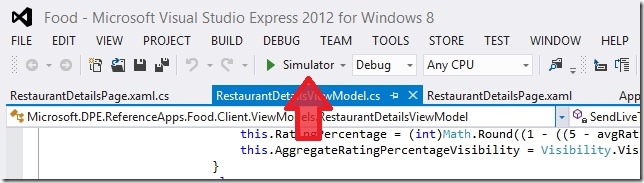
In the Run dropdown menu with the green play button, select “Simulator” (it is probably currently set to “Local Machine”). Then click the button to start the simulator.

When the simulator launches, you will see a menu of buttons on the right-hand side.

Below the minimize button, the buttons are (in order from top to bottom):
7. Ensure that your app is fully functional, and won’t be perceived as unfinished.
This maps back to certification requirement 1.2, which says that apps must be fully functional. A number of things in this category can trigger certification failures:
8. Test for performance.
Apps must launch in 5 seconds or less and suspend in 2 seconds or less, on a low-power computer. The Windows App Certification Kit does run performance tests, so you can use that data to measure how your application is performing. If you find that you do need to improve performance on launch and suspend, here are a few tips:
9. Provide a privacy policy if your app connects to the internet at all (or if you have the Internet capability checked).
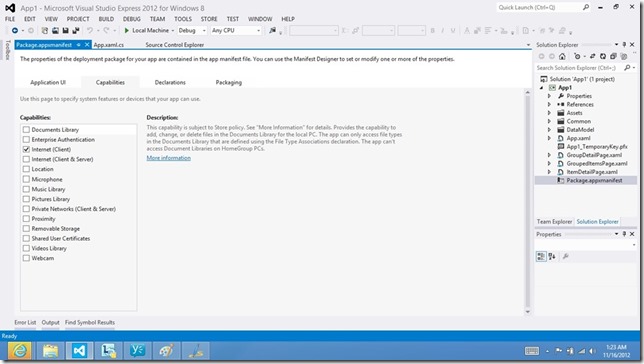
This is an extremely common reason for Windows Store submission failure. The “Internet (Client)” capability is enabled by default in the Visual Studio templates, so by default if you haven’t changed your manifest, you do have to provide a privacy policy. The capabilities are found in your Package.appxmanifest file, under the Capabilities tab:

If you are not using the internet, uncheck this capability, and you don’t have to provide a privacy policy. If you are using the internet, you need to create a privacy policy that explains what data is sent over the internet/what you are doing with it, post the privacy policy online, link to it in your application’s settings (accessed through the Settings charm), and provide the link when submitting to the Windows Store. If you do collect personal information, the user has to opt-in and give consent to share this information.
For more detailed information, see this “4.1 App must comply with privacy requirements” blog post.
10. Properly localize your app for all languages that it supports.
Here are some common “gotchas” that can cause the localization certification requirement to fail:
Hope these tips were useful!
So, you might wonder if there are any tips and tricks for passing certification in the Windows Store. Here are the top 10 tips that will help you pass certification.
1. Run the WACK.
The Windows Application Certification Kit (WACK) is an awesome tool. Perhaps you have developed for an app store before and encountered the really fun cycle of: submit your app, wait, receive a failure notice, fix your bug, re-submit your app, wait, receive a failure notice, fix your bug, re-submit your app, wait…and repeat.
The WACK reduces this cycle by giving you a way to screen your app locally for issues before you even submit it to the Windows Store. Essentially, the WACK is a series of automated tests (which are also run during certification). Running them locally, you can find and fix bugs before you submit your app to the Windows Store.
The WACK is installed when you install Visual Studio Express 2012 for Windows 8 (available as a free download here, halfway down the page in blue). When you install Visual Studio, you should also get a tile in your Start Menu for the WACK (see the picture below). Finally, here is some how-to documentation on using the WACK.
2. Test on ARM.
Particularly for the performance requirements, it helps to test on devices running ARM processors and/or low-end machines. In general, it’s a good idea to test on several different machines.
Also note that your app must provide the same user experience on all processor types that it supports (this is certification requirement 3.2). If your app has a different user interface or functionality when it runs on different processor types, you must submit a separate app for each processor type and describe the differences in the “Description” section of each app.
Finally, you may be wondering “How do I test on ARM?” since Visual Studio doesn’t run on ARM devices. You can accomplish this through remote debugging. Tim Heuer wrote a fabulous post on how to enable remote debugging on an ARM device.
3. Read the documentation.
I know that this part isn’t fun, but taking some time to read through ALL of the certification requirements will help you avoid mistakes. Here is the full list of Windows 8 certification requirements. There is also guidance on avoiding common certification failures and resolving certification errors.
Finally, here is the App Developer Agreement for developers and Windows Store Terms of Use for the users who download your app.
4. Create an accurate and compelling app listing page.
When you submit your app to the Windows Store, you will be required to fill out various metadata about your app: a description, age rating, etc. Take your time and do a good job filling out your application information. (If you’ve taken the time to write a great app, don’t rush through this part!) There is a lot of great guidance on this at Preparing your app for the Store (marketing has never been a strength of mine, so I find this really useful). Here are some specific tips around creating a great app listing page:
- Make your application description as detailed and descriptive as possible. There is guidance on creating a great app listing that is truly helpful.
- Don’t use your listing page to promote your company or products. Certification requirement 2.3 forbids advertising in an application description, so beware the appearance of trying to sneak advertising into your description.
- Most apps should have a rating of 12+. If you’re having trouble deciding between two age ratings for your app, choose the higher one. Remember that apps never fail certification for having too high a rating. (See certification requirement 6.2 for more info.)
- Don’t declare your app as accessible unless you specifically engineer and test it for accessibility scenarios.
- Make sure that you tell the tester everything that he/she needs to know. There is a “Notes to Tester” section when you submit an application, and you should utilize that as your mechanism to “talk” to the person who will be reviewing your app for certification. Besides the obvious items that you should provide (like the username/password of a demo account if your app requires login), you can explain your development choices and how they align to the certification requirements if you feel that anything may be misinterpreted.
Your app can use the Windows Store commerce APIs from the Windows.ApplicationModel.Store namespace for features like trial functionality or in-app purchases. If you use these: first of all, test your app to verify that it handles typical exceptions; you can do this using the Windows Store simulator available through the CurrentAppSimulator class. Then, make sure that you change your app to talk to the real Store and not the simulator before submitting (your app should use the CurrentApp class instead of the CurrentAppSimulator class, which is for testing purposes only). Finally, ensure that your app doesn’t crash if there’s no network connectivity.
6. Use the Visual Studio simulator for testing touch as well as different screen sizes, resolutions, and orientations.
A certification tester (and of course, your end users) may be using a machine very different from your development box. The Visual Studio simulator lets you test your application’s behavior in a variety of conditions.
In the Run dropdown menu with the green play button, select “Simulator” (it is probably currently set to “Local Machine”). Then click the button to start the simulator.
When the simulator launches, you will see a menu of buttons on the right-hand side.
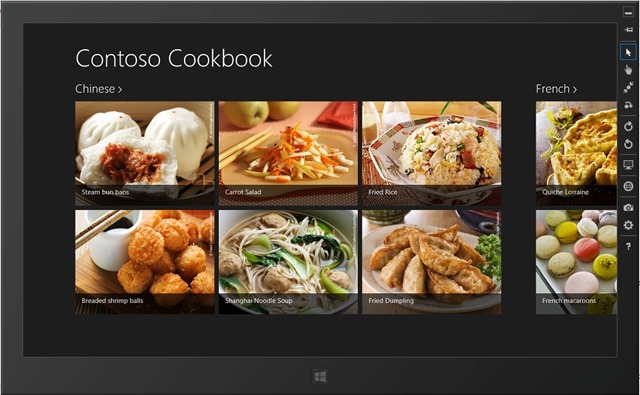
Below the minimize button, the buttons are (in order from top to bottom):
- Pin button – keeps the simulator always on top
- Arrow button – change to mouse mode
- Hand button – change to touch mode
- Zoom button – change to pinch/zoom touch mode (so you can simulate this gesture)
- Rotate button – change to rotation touch mode (so you can simulate this gesture)
- Rotate clockwise button – rotates the display clockwise 90 degrees (to simulate portrait/landscape orientation changes)
- Rotate counterclockwise button – rotates the display counterclockwise 90 degrees
- Monitor button – changes resolution
- Globe button – sets location
- Camera button – copies a screenshot
- Options button – changes the screenshot settings
- Question button – links to simulator help
7. Ensure that your app is fully functional, and won’t be perceived as unfinished.
This maps back to certification requirement 1.2, which says that apps must be fully functional. A number of things in this category can trigger certification failures:
- The description given for your app listing page in the Windows Store is inaccurate or overly vague.
- Any incomplete sections, unimplemented buttons or menu choices, links to webpages that are under construction, empty pages that should contain data, use of language like “coming soon” and “beta”, etc. will give the impression that an app is incomplete.
- Broken or missing functionality will trigger this failure.
- Make sure that you provide enough information for the testers to test. For example, if your app has “login” functionality, create a test user account and provide the username/password in the “Notes to Testers” field when you submit your application.
8. Test for performance.
Apps must launch in 5 seconds or less and suspend in 2 seconds or less, on a low-power computer. The Windows App Certification Kit does run performance tests, so you can use that data to measure how your application is performing. If you find that you do need to improve performance on launch and suspend, here are a few tips:
- Package content locally (or cache it) when possible, so you don’t have to pull resources from a network during launch.
- Load and do only what you need on launch. You can load other data and do other work asynchronously in the background or when you actually need it.
- Use a “dirty bit” when saving data on suspend, so you only save data that has changed. (Rather than re-serializing your app’s state if that data hasn’t changed, create a Boolean flag variable (or “dirty bit”) which signals that your data has been modified, and only re-serialize when the data has changed.)
- Use bytecode caching if you are developing in JavaScript, so each JS file has bytecode created once and not every time the app launches. To enable this, make sure all JavaScript files are UTF8 encoded with a byte-order mark (BOM) and are statically referenced in the root of your HTML start page.
9. Provide a privacy policy if your app connects to the internet at all (or if you have the Internet capability checked).
This is an extremely common reason for Windows Store submission failure. The “Internet (Client)” capability is enabled by default in the Visual Studio templates, so by default if you haven’t changed your manifest, you do have to provide a privacy policy. The capabilities are found in your Package.appxmanifest file, under the Capabilities tab:
If you are not using the internet, uncheck this capability, and you don’t have to provide a privacy policy. If you are using the internet, you need to create a privacy policy that explains what data is sent over the internet/what you are doing with it, post the privacy policy online, link to it in your application’s settings (accessed through the Settings charm), and provide the link when submitting to the Windows Store. If you do collect personal information, the user has to opt-in and give consent to share this information.
For more detailed information, see this “4.1 App must comply with privacy requirements” blog post.
10. Properly localize your app for all languages that it supports.
Here are some common “gotchas” that can cause the localization certification requirement to fail:
- The app’s metadata provided during the submission process on the Description page (such as its description, features, keywords, or screen shots) is either missing or doesn’t match the languages defined in your application. For example, you may accidentally provide a description in English for the Chinese version of the app.
- Don’t forget to provide localized screen shots! This one has tripped up a lot of folks.
- The app must support one of the certification languages. That is the subset of languages for which we have testers to confirm that your app meets the certification requirements.
- Make sure that the app is functional and complete for all of the languages that you claim. If any claimed language support is incomplete, this requirement will fail.
Hope these tips were useful!


 Internet Explorer
 Firefox
 Google Chrome
 Opera
Opera Safari
 Windows
 Registry Cleaner


